Monday, April 20, 2015

Kozhukatta - Coconut Stuffed Sweet Dumplings

Palm Sunday is really a great day..........

Celebrating the triumphal entry of Jesus into Jerusalem.

Jesus,you entered Jerusalem knowing that it will end in your sacrificial death, for all the sin humans performed.

' Hosanna to the son of David! Blessed is he who comes in the name of Lord!'
The large crowd shouted waving and throwing palm leaves as you passed by.

In our churches, we receive Jesus with flowers and coconut tree leaves (the custom). (We don't have palm leaves there and coconut trees, a lot.........)


But before the Palm Sunday!!!!!!!!!!!
That is a delicious saturday.......
We used to make kozhukatta, the dumplings stuffed with sweet coconut, on the Saturday before palm Sunday. We call that day as kozhukatta Saturday.

Don't ask me why and what is the relation. I seriously don't know. 
That's the custom being followed by the generations.


Now the recipe,


Kozhukatta


The Ingredients :

Rice flour                    - 2 cup
Water                         - 3.25 cup
Coconut shredded        - 1 cup
Cardamom                  - 1/4 tsp
Jaggery powder           - 3/4 cup
Powdered orange zest  - a pinch
Salt                            - 1/2 tsp


Method

First prepare the filling. Mix Jaggery and 1/4 cup water in a bowl. Boil to form a thick syrup, just before the one thread consistency. Remove from heat.


In a pan mix coconut and jaggery syrup well. Cook for 2 - 3 minutes.Switch off the flame.


Powder the cardamom.

Add this to the coconut filling and mix well.


Now add the dried orange zest powder. A pinch is more than enough. Mix well.


 The filling is ready. Keep it aside.

Now prepare the dumpling base.

For this take 3 cups of water in a bowl. Add salt and boil the water.


While the water is boiling, dry fry the rice flour on medium flame.


Take the fried flour in a bowl. Add the boiled water, to the flour with mixing. Cover and keep it aside.


When it is warm enough to handle, knead with hands to form soft dough ball. The right consistency is when the dough is not sticking to hands.


Wet your palms to avoid sticking. Make medium size balls from the dough. Then holding the ball in one hand, press the center of ball inward out to form a cup shape.


Fill the cup with coconut filling.


The close and seal the cup to form a ball, again. Repeat with the rest of the dough.


Steam the dumplings in a steamer for 10- 12 minutes. Then switch off the flame. Keep it covered for 1 - 2 minutes.


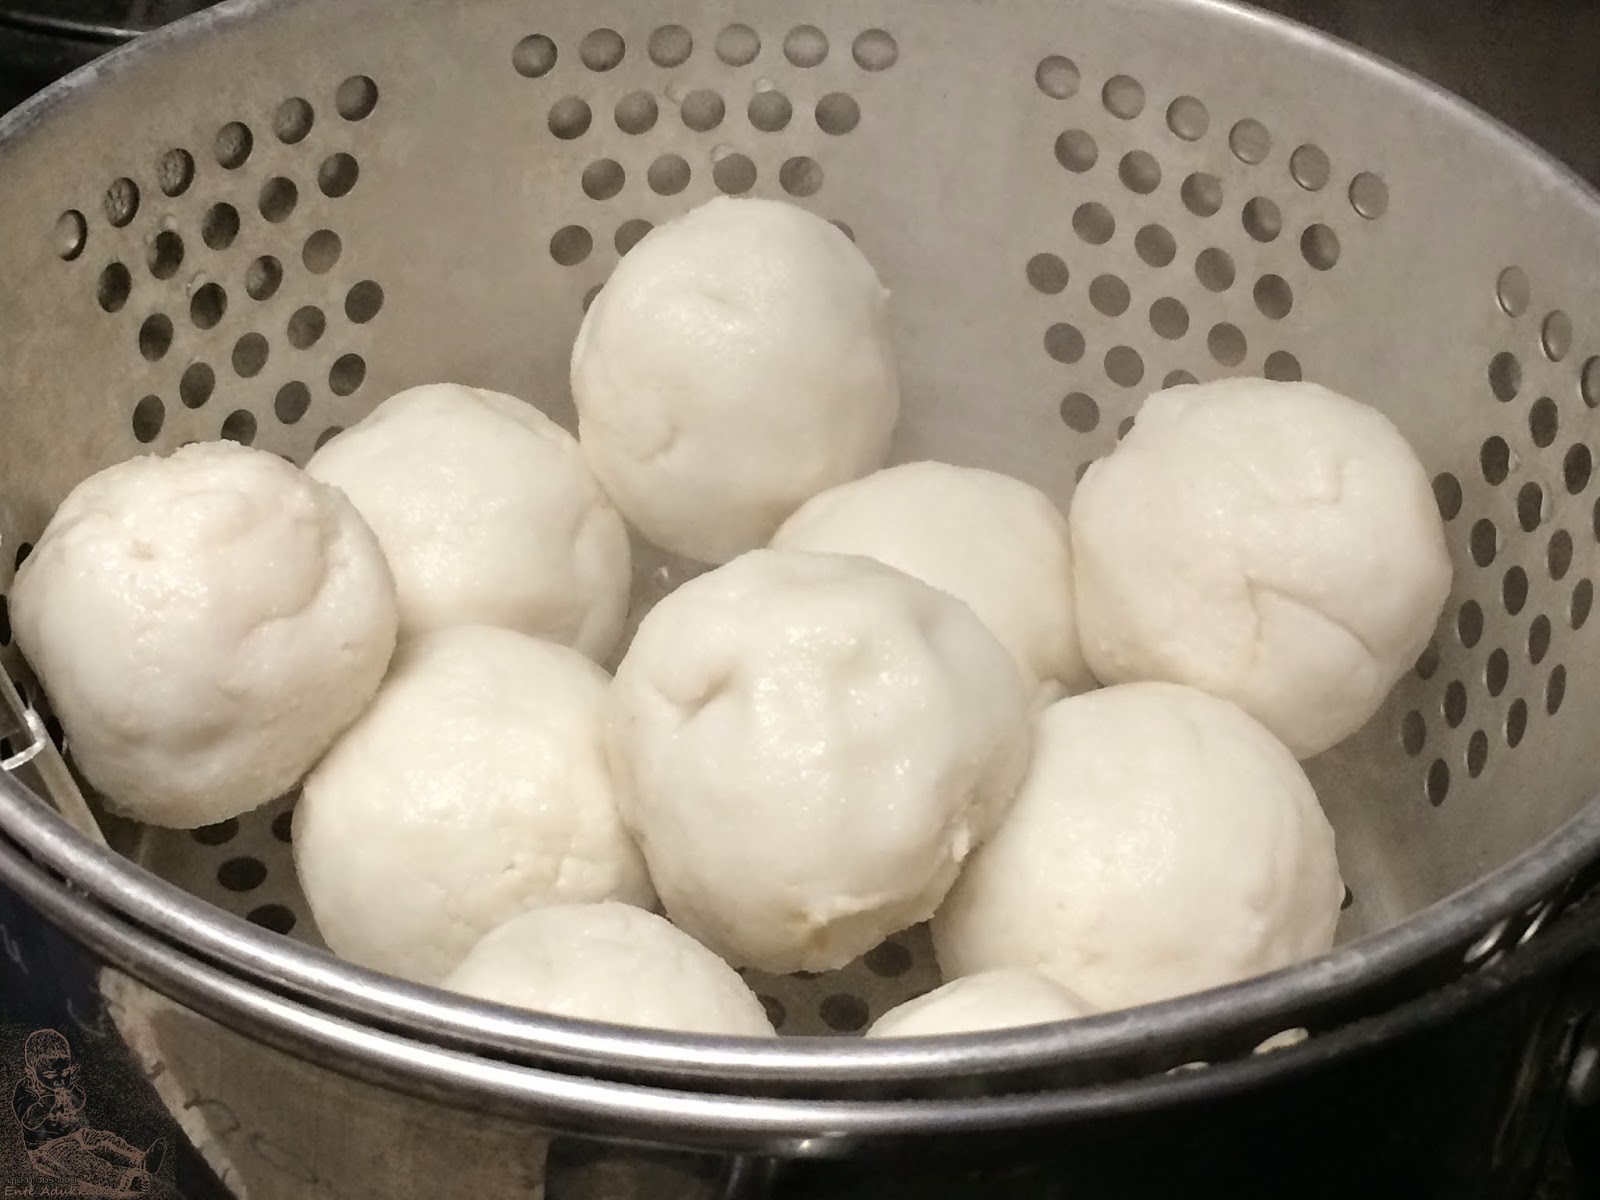
Kozhukatta is ready.


Serve Warm.

Enjoy Kozhukatta Saturday.


But recently i had read a beautiful interpretation for making kozhukatta on those Saturdays.

"That was the day Lazarus was brought back to life by Lord Jesus. He asked the men to move the stone from the cave entrance and called out to Lazarus and he came alive.
Kozhukatta is believed to represent the stone, when opened reveals the sweet life God gave us."

I don't know whether this relation is true, but i loved this version.

Happy Cooking


Wednesday, March 25, 2015

Heavenly Sweet Carrot Truffles / Carrot Laddu


I love vegetables. But i hate carrots. They taste raw, right? When made curry they taste sweet. I don't like my spicy curry to be sweet also. May be many of you are like me, (i said may be). Then this post is for you friends. 

Carrot truffles,carrot halwa, Peeled carrots


And those who love carrots will love this heavenly treat for sure. And why shouldn't they? Its yummy, delicious................ hmmm, my mouth is watering. Yes it's me (who hate carrots) saying this. These truffles are easy to make with less ingredients. Carrot Truffles make perfect desserts for parties and get together.

Carrot Truffles plated presentation
Carrot Truffles


Here goes the recipe...

The recipe is similar to carrot (gajar) halwa. I just made it into small balls. That makes it easier to serve and more appetizing. 

Sweet Carrot Truffles


Preparation time : 10 minutes
Cooking time      : 1 hour
Yield                  : 20 truffles

The Ingredients:

Carrot grated          - 5 cups
Sugar                     - 1/2 cup
Milk                        - 1.5 cups
Ghee                      - 4 tbsp
Cardamom              - 3 or 4 
Raisins (optional)     - 1 tbsp
Nuts (optional)        - 1 tbsp


The ingredients, carrot, milk, sugar, ghee, cardamom, nuts,pista, almond, raisins
Ingredients for Carrot truffles

Method

 Peel, wash and grate the carrots.


peeled and grated carrots for truffles
Grated carrot

Heat the pan in medium flame. Add 3 tbsp ghee into the hot pan.


Add ghee into the pan for cooking carrots
Add ghee to the hot pan

Add the grated carrots into the hot ghee. Mix well. In very low flame, cook until the carrots are cooked and doesn't taste raw. This will take some 20 minutes. All the water in the carrot should evaporate.

Carrots taste raw.Cook in low flame to remove raw taste of carrots
Cook grated carrots in ghee.

Now add milk into the cooked carrots. Cook in a medium flame for 15 minutes or until the milk is completely absorbed by carrot. The carrot should again become dry.

Mix well and cook carrots in milk to make it tender and tasty
Add milk into cooked carrots

Add the sugar into this dry carrot-milk mixture.Then the mixture will again become watery as the sugar dissolves. Continue cooking in medium flame until this mixture is again dry. This time the carrot mixture will be sticky. Caramelization is the process happening here. This will again take some 15 minutes to dry completely.

Caramelization makes the carrots sticky.makes easier to form truffles
Add sugar to carrot and cook

Meanwhile powder the cardamom (avoid this if using powdered cardamom).

Powder cardamom and add to halwa
Powder the cardamom

When the mixture is dry and sticky, switch off the flame. Add cardamom powder and remaining ghee. Mix well to combine.

powdered cardamom adds flavor and ghee tastes good
Add cardamom and ghee.


Then add nuts and raisins.

garnish with nuts and raisins
Add nuts and raisins

Till this point it is CARROT HALWA.

From here this will be called the SWEET CARROT TRUFFLES.

When the halwa is warm enough to handle, make small lemon sized balls. Sprinkle some sugar in a plate or cookie sheet. Place the truffles in the plate. Dust with sugar. 

carrot laddu
Make truffle balls from carrot halwa.

Enjoy...

carrot laddoo
Carrot Truffles with nuts and cardamom flavor

Sometimes when I am ignored or rejected,  i get more inspired. This post is such an inspiration. 


Happy Cooking


Sunday, March 8, 2015

Homemade Eggless Flaky Croissant

Eggless Buttery Flaky Croissant,step by step photo tutorial
Eggless Buttery Flaky Croissant

For me, croissant is all about Germany. Actually croissant is a viennoiserie (things of Vienna). This Vienna-style pastry is famous for its crescent shape. I first had croissants on a trip to Germany. At the time I was not that much interested in cooking. I was even scared of making experiments. I only wanted to taste everything. And, I must say, every taste was different. Till then Bread was just a soft thing for me with rectangle shape or sliced squares. Variety in bread really surprised me.

But, wait a minute, croissants, I have seen something similar to this spiral flakes. Yes, the Puffs, Stuffed Vegetable or meat puffs. I hated those stuffed vegetables and will always give it to my amma whenever I get one. I only wanted the flakes of bread. And here it is, The Croissants.

Then after 1 year, sitting alone and getting bored in the house wake up the experimenting cook in me.

I wanted to make croissants. I searched the recipe. But most of them had egg and I don't want egg in my recipe. After doing lots of research and making, I am sharing my first blog recipe,

EGGLESS FLAKY HOMEMADE CROISSANT.

viennoiserie or Vienna-style pastry,Puff pastry
Yummy Croissant

The making of croissants is really time consuming but totally worth the time.

Croissant ingredient list:


Croissant Ingredients

All purpose flour - 3 cup
Warm Milk         - 3/4 cup
Lukewarm water - 1/4 cup
Active dry Yeast - 1 tsp
Salt                   - 3/4 tsp
Cold unsalted Butter - 2 oz(4 Tbsp)
Sugar                - 1/4 cup


Yeast Proofing
Yeast Proofing


First proof the yeast. Combine yeast, sugar and lukewarm water. Let it sit for 15 minutes. After 15 minutes  the liquid will start to foam. Yes, the yeast is working. (I took the pic before 15 minutes and the foaming is not complete)                 


Meantime cover the butter block in a plastic wrap. Make it into a flat square sheet by slightly pounding and rolling. We can use a roller for this.


Making Butter Sheet
Making Butter Sheet


Keep the butter sheet in the refrigerator until the croissant dough is ready.


When the yeast proofing is complete add the flour, sugar, milk and salt into the bowl.


Croissant Dough
Croissant Dough


Knead to form a soft dough. The dough will be softer than bread dough. Cover and let it rest in the refrigerator for 30 minutes. Letting it rest help the gluten to activate so that the dough can be stretched and rolled without breaking.

Now starts the interesting, same time, difficult part.


Clean your work surface. Dust with flour. Keep the dough on the dusted surface. Make a cross on the dough ball with a knife.


Keeping the middle part a little raised, roll to form a star shape.


Wrapping butter with dough,Croissant lamination or layering
Croissant lamination step 1


Now take the butter from the refrigerator, unwrap and place it in the middle raised portion of dough. Then wrap the butter sheet with the dough, each part completely covering the butter.


Croissant lamination step 2


We will get a square block. (If the butter starts to melt, stop everything and keep it in the refrigerator for sometime).


Croissant layering step 3
Croissant lamination step 3


Then roll the square to form a rectangle sheet. Fold the rectangle dough sheet to form a square again. Wrap in a plastic cover and keep it in the refrigerator for 30 minutes. 


Croissant layering step 4
Croissant lamination step 4


After 30 minutes take the dough from wrap and again roll to a rectangle sheet, fold to form a square, cover with a plastic wrap, again refrigerate for another 30 minutes.


Repeat the rolling and folding process 2 more times with 30 minutes refrigeration gap, so total 4 times, which will form many unseen buttery layers inside the soft dough sheet. We can make thousands of layers by repeating the rolling and folding process.

Preheat the oven to 350 °F (176 °C)

Line a cookie sheet or pizza pan with parchment paper.

Shaping the dough for croissant,crescent
Cut dough into triangles


Now trim the uneven edges to form a perfect rectangle. With a pizza cutter or knife, cut the dough into triangles.


Crescent Shape making step 1
Crescent Shape making step1


Make a small cut at the base of triangle.


Croissant  Shape making step 2
Crescent Shape making step 2


Pull the sides apart.


Rolling to crescent shape,Crescent Shape making step 3
Crescent Shape making step 3


Make a tight roll.


shaped croissant in pan
Place the croissant in a pan


Place it in the cookie sheet 1 inch apart so that it won't stick together when cooked. Yes, it will double in size. Let it rest for 30 minutes at room temperature.

preparing milk-butter mixture,microwave the milk-butter mixture
Microwave milk and butter


I used butter and milk mixture for glazing. Combine 1 tsp butter with 1 tsp milk. Microwave until butter melts(10-12 seconds). Usually egg wash is used for this.


Brush the croissant with milk-butter mixture


Brush the croissant dough with milk-butter mixture.


Place it in the preheated oven. Cook for 25 minutes or until the crust turns golden brown. Let it cool down.

You are done. You will forget all the difficulties you came across in making this when you have the first bite.
Egg-less flakybuttery croissant,Delicious croissant,How to make croissant
Eggless flaky Croissant

Croissants had assured me that I have lot of patience.

Take risk, Get out of your comfort zone, You will learn something new.

Happy cooking.....